I turned a disater on its head :-)

This about sums up my day today.
Blue funk to start with, smiles at the end!
Producing!

After a bit of tuning I was getting very even and more impotantly SQUARE bevels. I spent the rest of the day breaking my planks and scarfing them over again.
I have had a breakthrough on this project by doing these procedures over again. I have made a deal with myself not to give up on this when things are frustrating.
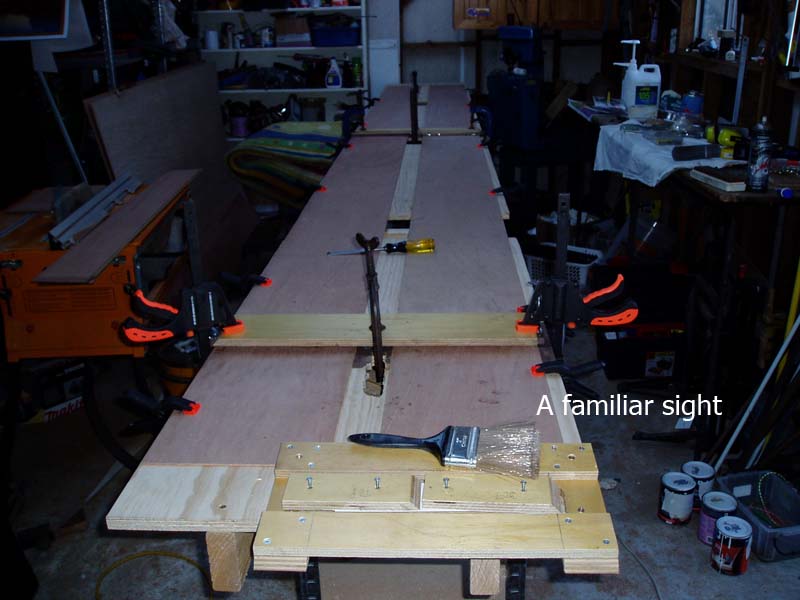
After I did all the scarfs over, I laid out two 10" planks, glued and clamped them. I cut a hole in the bench with the router (then a hole saw then a chisel) so that I could set up a center clamp. It worked a treat and the scarfs were really nice looking.
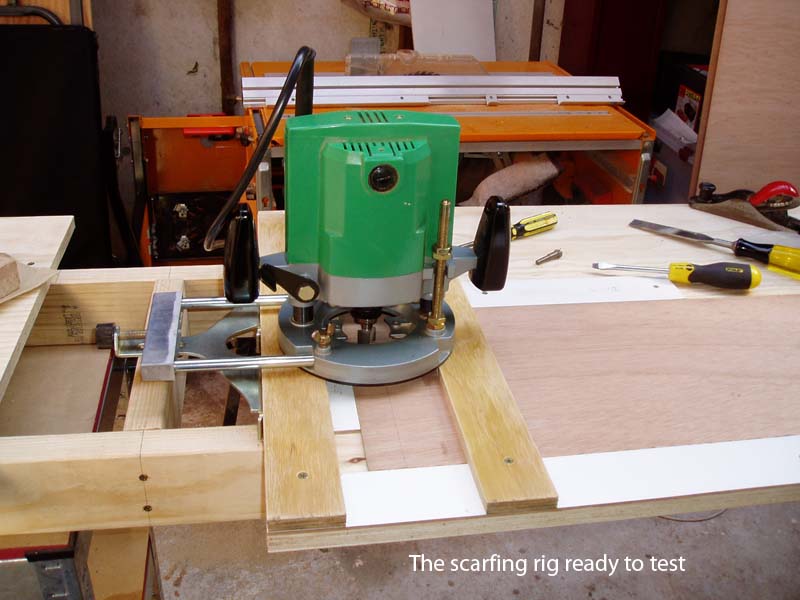
Let's go scarfin now, everybody's learnin' how...


I tested the new jig on some scrap and then progressed to some pieces I intend to use for extending the bottom planks. I progressed onto the 11" planks and then the 10 inchers. An important part of the jig was the clamping block. I slips under the back crossmember on top of the workpiece to clamp it evenly and flat.
A jig or a sea shanty?
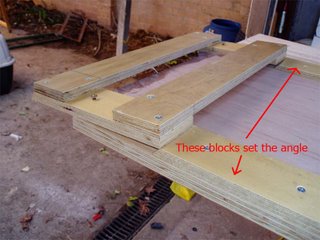

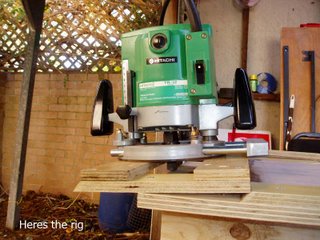
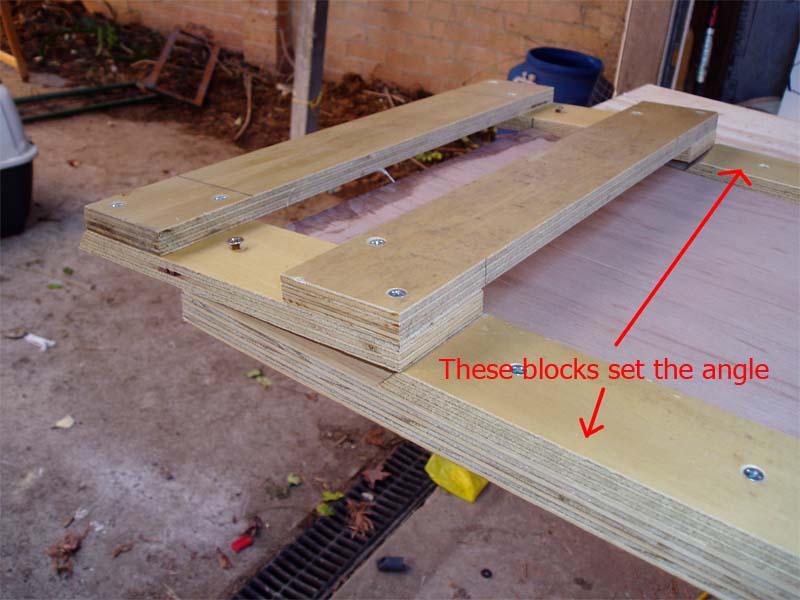
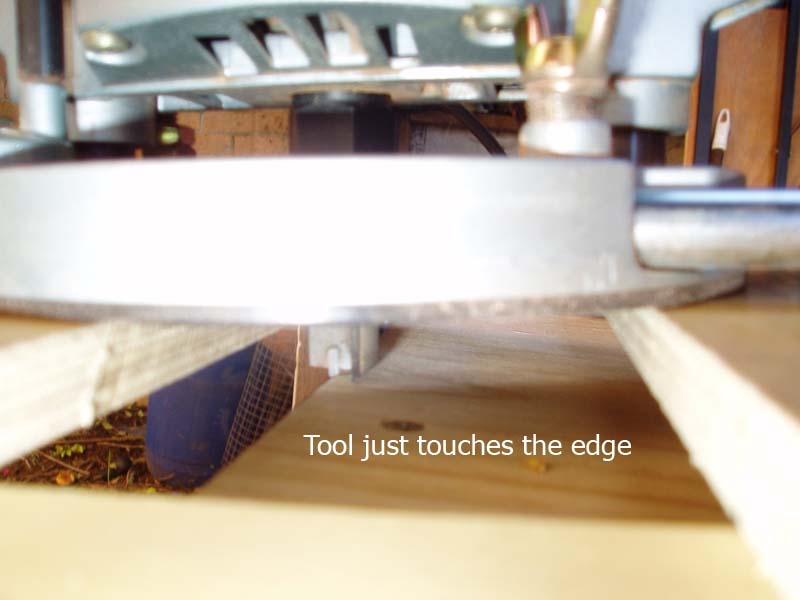
The frame sits on the end of the bench. I needed it to overhang enough so that the tool wouldn't be over half way into the ply on the first pass. I could only achieve this with the frame ovehanging about 12mm. The first pass would be done with the fence up against the top cross member of the frame. The tool had to just touch the edge of the bench to achieve the fine edge needed for a good bevel. I put two screws through the short sections, close to the edge. Then, after backing them out a few turns, I got a couple of chamfered blocks to tilt the router table. I tool an 11" palnk and marked the 1 and 1/4" line where the bevel should span. I pushed the plank up to the edge and then tilted the table so that the top of the wedge shaped gap that opened up, lined up with the mark on the plank. This is how I knew that I would be able to make a correctly dimensioned bevel.
To finish, I tightened up the two screws and drove two long screws through the joint at the back edge to clamp the router table down to the tilting blocks.
The tilting blocks doubled up as guides for the 11" planks. I decided that I'd put in two additional guides further down the bench and then move one of those when I was dealing with the 10" planks.
The new deal

After accepting that I had made a howling error on the lap scarfs (it took a day to let it sink in) I returned to the builders manual to learn about bevel scarfing. I tried a couple with my block plane and got reasonable results but I thought I could speed up the process by returning to the trusty router. To this end I devised a new jig to cut bevels. I wanted to build some thing I could leave set up, just in case I forgot a couple (like I did on the previous attempt). Here, I am starting out with some 12mm ply that I salvaged from my old kitchen. It's all made from this ply, ripped to 60mm the long sides will acommodate the 11" planks between the two shorter pieces. It's important to keep the whole jig as square as possible during construction. This will simplify the setup and tuning later on.
Disaster!!!
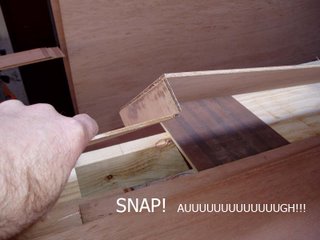
So here i was thinking "Great! I've finished all my scarfing, time to get into the lofting!" So I get one of my 10 inch wide planks and manhandle it onto the table. I'm almost there when, SNAP! My carefully made and smoothed scarf joint snaps! AUUUUUGH! As Charlie Brown would say. At this point I had a choice to make. Would I test my other scarfs? maybe this is a one off. So I tested another one, it snapped too. I remember my Dad suggesting I do the scarfs this way instead of using the bevel. "Why?" I asked, "because its stronger" came the authoritative reply. Stronger = Better as far as i'm concerned. So off I went.
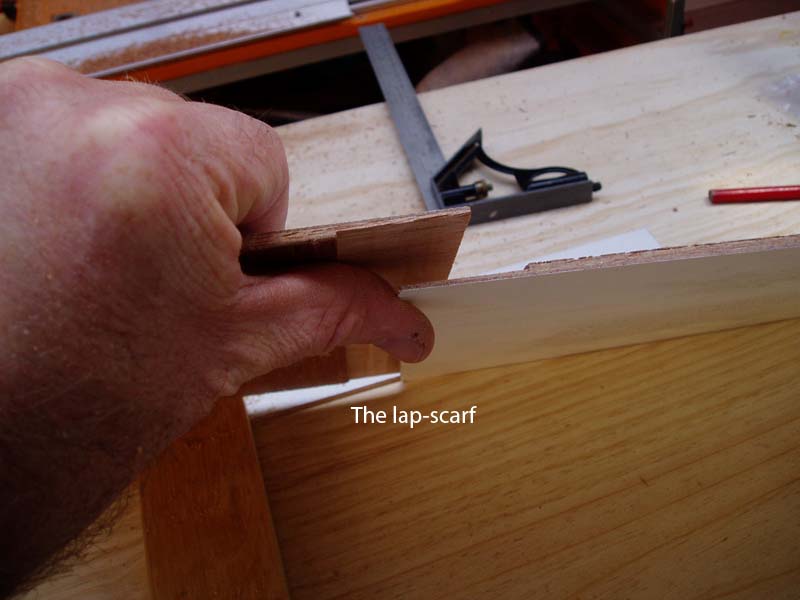
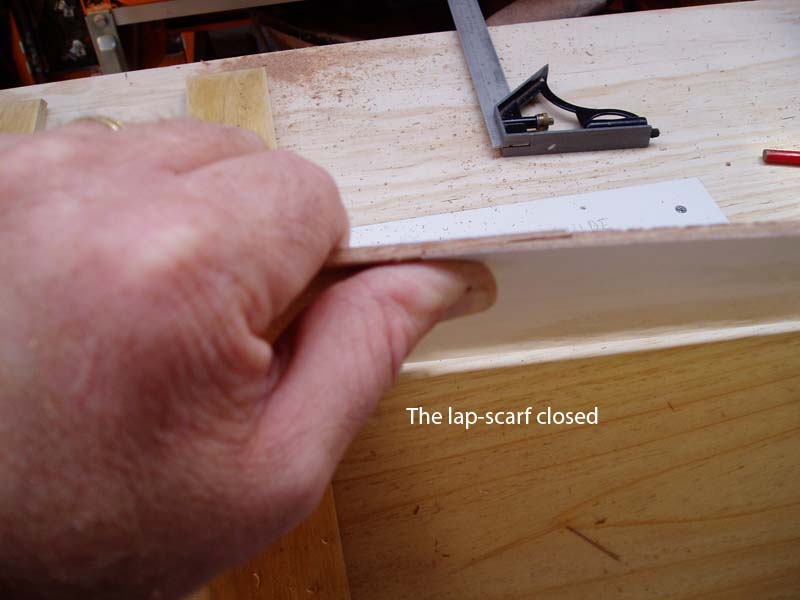
Some background on the lap-scarfs.
My Dad and I built a 37 ft fiberglass yacht together. We built it from scratch. Starting with a rectangle pegged out in the back yard we built a shed, a strongback (for setting the frames on) and then proceeded to construct a male mould and laminate it with fiberglass. So far so good. When Dad came to the bulkheads, he had to scarf three sheets of ply to make something wide enough. He used a lap-scarf rather than a bevel. I can see now, why he did. A lap scarf is easy to make with a router, it's self aligning and it's neat. But wait, there are no bending loads on the bulkhead, mainly torsional. Plus, the whole thing was laminated with fiberglass, making the ply a core rather than a sole load bearing structure.
The ply in the LT 17 is a core too but it is subject to bending stresses during construction and in service. Bevel scarfs make much more sense in this situation. Look at my laps. As soon as the resin bond fractures on the butt end of the scarf, the material becomes half as thick at the next point of failiure. At which pint 4mm ply will break easily along the line cut by the router. In other words DISASTER!
More Scarfing

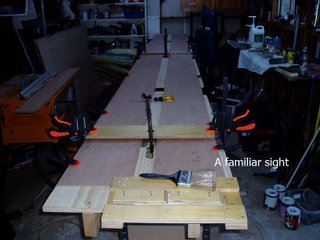
More scarfing. I have abandoned the buckets of water (stupid idea!) and I am now doing only two scarfs at a time. I know the build manual says to stack 'em up and do a heap together but I like taking my time with it. These are the topside planks so next will be the lofting stage. I still don't have a batten for marking out the curves but theres a ton of timber yards here so I should be able to scare something up.
Light pressure
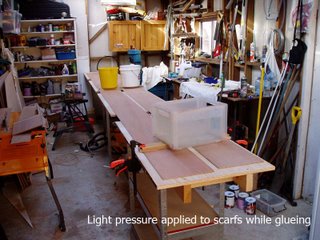
When using straight epoxy on the joint you have to do it in two stages. First mix up a batch of epoxy then paint the joints with it. Leave the resin to soak in for around 10-15 minutes. Come back and paint'em again, then put them together. Relatively light clamping forces are needed because you're not trying to squeeze out the thickened epoxy to make a tight joint. See the pic for my clamping rig. Just some pieces of scrap to spread the weight and some buckets of water as weights.
I will admit to one disaster with this setup. I had lost the piece of wood that I was using as a weight spreader and just grabbed another piece that was narrower. I put the bicket up there and the darned thing tipped over as soon as I let go of the handle! Curing epoxy looks very sad when it's mixed with water, turns all milky. I had to grab a rag and wipe all the water away then get a fresh pice to get all of the potentially contaminated epoxy out of the joints (I was doing two at a time). Anyways I got the whole mess sorted out and completed the joints.
At this point I'd say the lap scrfs have been a success. They are very strong and the joint conforms well to any bend in the ply. The main provisos I'd put on them is, careful jig setup and then careful fitting before putting any epoxy on them.
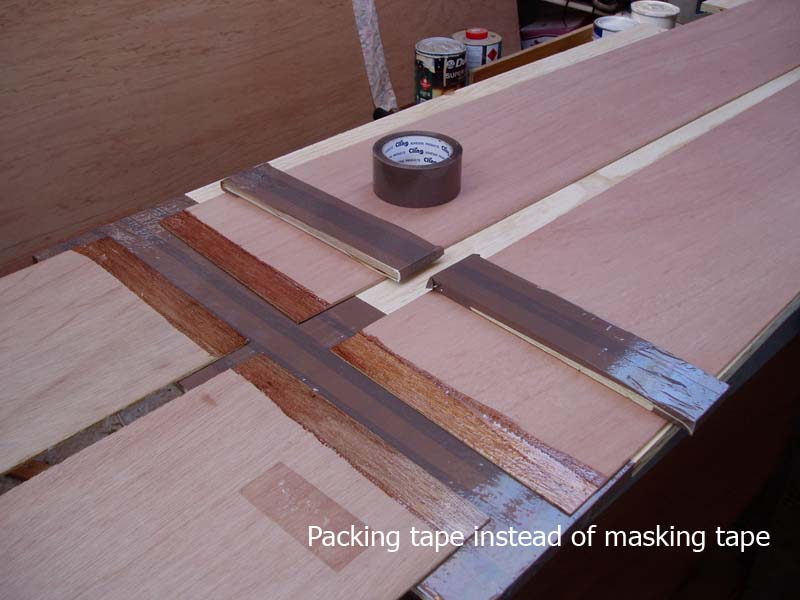
Rethink on the tape issue
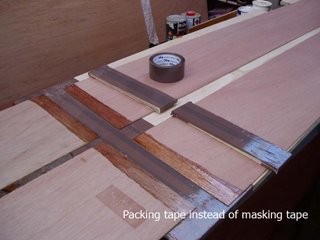

For the next job I used packing tape which I think is basically Mylar as a release agent. Each of the joints had a piece of scrap over it to even out the pressure. I put packing tape on that, intead of making tape. I also put a layer of packing tape down on the table to prevent unwanted adhesion. It's worth noting here that I have once again diverted from the makers instructions. Not only have I used a lap scarf instead of a bevelled scarf, I have
not used epoxy-filler mix for my adhesive.
I used straight epoxy on the joints as suggested to me by another builder on the Chesapeake Light Craft Builders Forum. I would highly recommend this forum to anyone who is building a stitch and glue boat. Anyway, the mylar tape released from the cured epoxy just fine. The squeeze-out was a little thicker and took a little more cleaning up but I wasnt trying to extract layers of tape from the whole thing which was the main benefit.
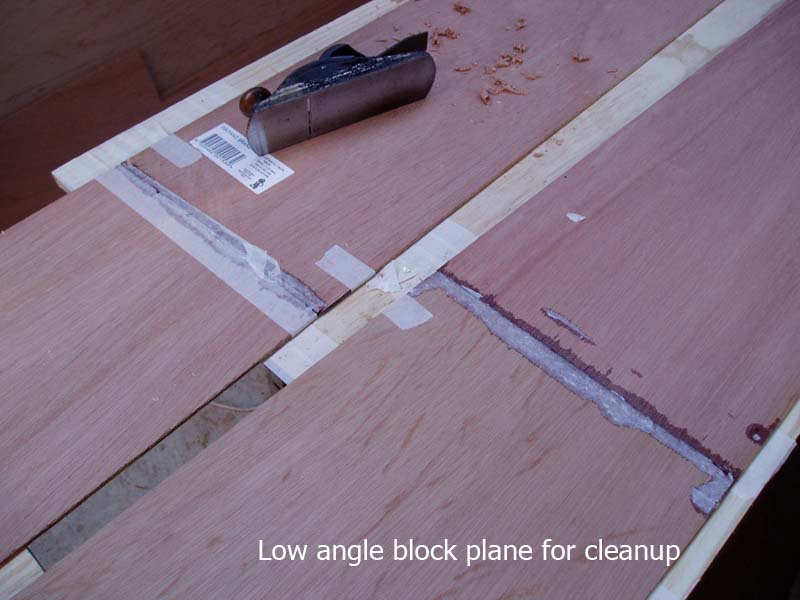
Cleaning up the joints

I used my low-angle block plane to smooth off the joints. The epoxy soaked into the masking tape making for an irritating cleanup. I also put down a layer of tape to stop the job sticking to the table. This also stuck to the joint. Sheesh! Me and my great ideas!
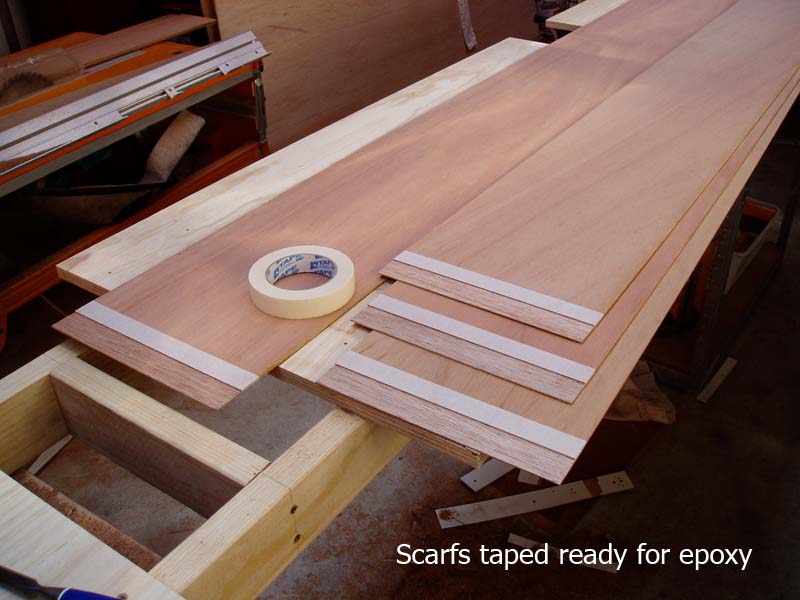
Bring on the epoxy!


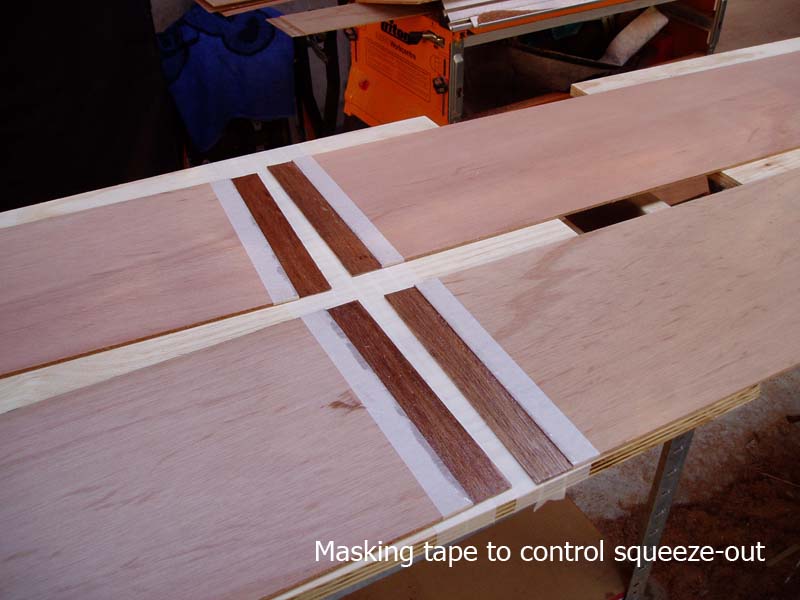
Here's my nicely routed planks ready for some nice epoxy. I put some masking tape on the edges of the cut to control the squeeze-out of the resin. This would turn out to be a fairly dopey idea


Here's the result of the jig. Each piece cut precisely down to half thickness. I plan to join these using unthickened epoxy. The trick is to paint both surfaces with catalysed epoxy, then leave the first coat to soak in. To complete the joint, paint again then clamp lightly.
Edit here! See the DISASTER! post above before doing this type of scarf. It's not up to the bending loads on the joint. It will fracture easily, leaving you with a lot of work to "do over". Stick to the book on this and make bevel scarfs.
Testing the router jig.

I tested the jig on some scrap first and discovered that the resulting cut wasnt square with the side. This was caused by the fence guide not being proud of the end of the table. I had to reposition it so that the fence ran along it only and not the end of the table too.
Some progress

Well not much happened for a week or more but I have now put all the scarfs on the planks I cut. I may have mentioned before that i was not going to make scarfs in the usual way but do lap-scarfs. To achieve this I have made a jig for my router. The jig is simple. Two lengths of coated 4mm ply screwed to the table set the height and act as guides. Two pieces of 12mm ply at 90deg on top make the platform and the left hand piece serves as a guide for the router fence.
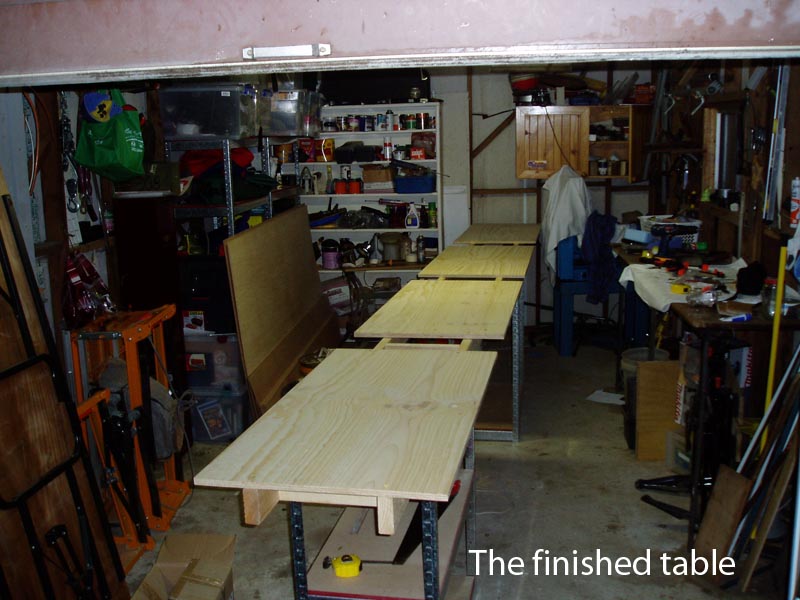
Finished table

Here's the table done. The idea is that I have sections to rest the parts on and gaps to add clamps. I'll probably do the sheer clamps on this table too. Here's the rough construction details. One sheet of 17mm construction ply 2400mm x 1200mm ripped lengthwise. Two beams of construction grade pine 35 x 70 x 6000 mm. I cut the beams down to 18 feet and cut the two pieces of 17mm ply in half across. I used the offcut from the pine beams to make the crosspieces and they came in at around 560mm. As you see, its on top of a couple of steel framed benches that I got from the local hardware megastore (Bunnings for the Aussies). You can make these up into either a shelving unit or two benches. I will rest the table on the benches while it is in use. I may have to screw a set of blocks onto the tops of the benches to stop the table from slipping off.
Table construction.

Lofting table. No big mystery to lofting. It's where you take the dimensions off the plans and tranfer them to the wood. Full scale of course! I have seen people loft on the floor which is okay I suppose but i thought it would be good to have a table, high up enough to work comfortably at and also to do a couple of the other steps in the "plans-built" process. Firstly, I have to scarf (join) the three pieces necessary to bring the craft up to seventeen feet. Next, the lofting phase, laying out the scarfed pieces and marking the "chine", "sheer" and "station" points. Then the final phase of lofting. Having laid out the points, you need to "join the dots" this is achieved with a "batten" a long flexible piece of material that will hold a fair curve. Finally, the cutting phase. Once again, height and clamps. So there you have it, enough work for me to invent the Scarfing/Lofting/Cutting table.
Ripping

"Here I'm ripping the planks that will end up being the sides and bottom of the kayak. I will need to join three pieces by scarfing them. Chesapeake reccomends a tapered scarf but my Dad suggested doing a stepped scarf with the router. To ahieve this i will have to build a jig to cut exactly half way through the ply. More on that later.
Beginning Construction

Here's the stack of plywood that I'll be transmogrifying into a Kayak. I hope...
The darker sheets are 4mmPacific maple marine ply and the lighter ones are 4mm Cedar marine ply. Hidden away is the sheet of 6mm and the 17mm I ordered for the lofting table. The beams for the lofting table are lying on the floor.
Hi to all you kayak builders out there. First a little about myself. My name is Ben Roberts and I live in Wollongong Australia which is approximately 50 miles South of Sydney on the coast. I am a Broadcast Engineer and at the ripe old age of 43 I have a wife and two kids (both girls. I am SO outnumbered!) . I have chosen to build a Chesapeake 17 LT from plans. Most people build from kits which have pre-cut plywood but I thought that it would probably be cheaper to build from plans.
The other advantage I could see was being able to pick and choose the materials from local suppliers. To this end I have selected for my hull: Pacific maple for the bottom and side panels and cedar for the decks. The Cedar is much more dense than the Pacific Maple but it has a beautiful figure in it. Should look great varnished!
If you want to know why I chose the Chesapeake design over the many on the market here's why. I like the shape and the fact that those who have them say that they paddle very well. I really like the cambered decks, especially the foredeck. They can be constructed to weigh around 13 kilograms complete and are very strong.
I looked around at some fiberglass and moulded plastic boats but really.... you cant beat wood! I am not an experienced paddler. Most of my kayaking was done in the Scouts back in the 70's. We used to race for the two or three kayaks on the canoe trips. If you didn't get a 'yak, you'd have to paddle a dunger old canadian for the trip. Sloooow!

 After a bit of tuning I was getting very even and more impotantly SQUARE bevels. I spent the rest of the day breaking my planks and scarfing them over again.

 The frame sits on the end of the bench. I needed it to overhang enough so that the tool wouldn't be over half way into the ply on the first pass. I could only achieve this with the frame ovehanging about 12mm. The first pass would be done with the fence up against the top cross member of the frame. The tool had to just touch the edge of the bench to achieve the fine edge needed for a good bevel. I put two screws through the short sections, close to the edge. Then, after backing them out a few turns, I got a couple of chamfered blocks to tilt the router table. I tool an 11" palnk and marked the 1 and 1/4" line where the bevel should span. I pushed the plank up to the edge and then tilted the table so that the top of the wedge shaped gap that opened up, lined up with the mark on the plank. This is how I knew that I would be able to make a correctly dimensioned bevel.
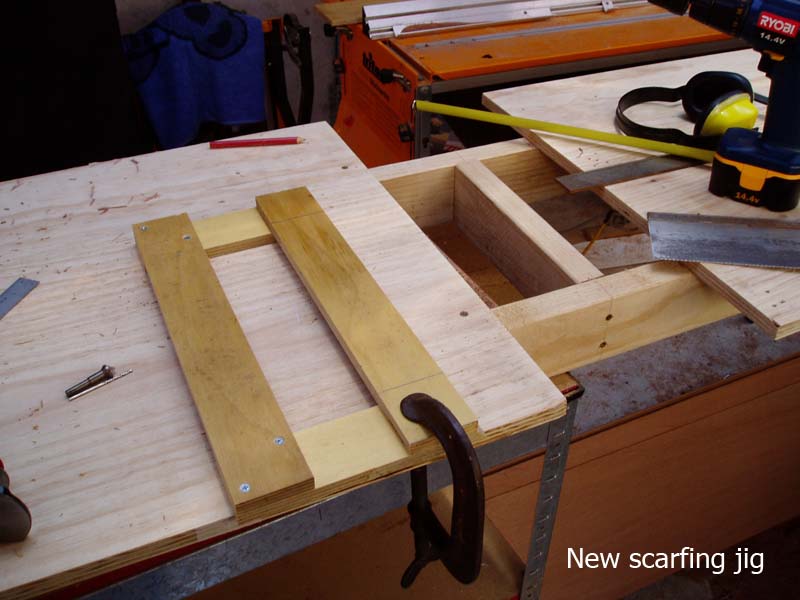

 More scarfing. I have abandoned the buckets of water (stupid idea!) and I am now doing only two scarfs at a time. I know the build manual says to stack 'em up and do a heap together but I like taking my time with it. These are the topside planks so next will be the lofting stage. I still don't have a batten for marking out the curves but theres a ton of timber yards here so I should be able to scare something up.


 I tested the jig on some scrap first and discovered that the resulting cut wasnt square with the side. This was caused by the fence guide not being proud of the end of the table. I had to reposition it so that the fence ran along it only and not the end of the table too.